In this POC, I will show you how to integrate Pega 8.5.1 with Meta (Facebook) messenger.
Demo Video:
The Steps are as follows:
- Will download Facebook Channel component from Pega Marketplace and install in our application.
- Will create a Case Type MyWebChat.
- Will Create a Facebook channel in Pega App studio
- Will configure the Facebook Channel properly with the details received Facebook developer console.
- Finally will test it.
Let’s Goooooooooooooooo !!!!
Pega set up:
In Pega platform go to application definition,

In the above screenshot it is added but in your case it will be blank.
Under Enabled Components –> Click Manage Components
Go to Browse Apps and components

It will take you to Pega market place (formerly called as Pega Exchange).
Then search for Facebook Channel

Meta (Facebook) Configuration:
Login to Facebook with your account id and password,

Keep it as is,
Now login to ‘facebook for developer’ console, it will automatically login as you have already logged in to Meta (Facebook user account)
Home page of Facebook for developers will be as below,

Click the My Apps on right top corner,

Click Create App – Green button

Select Business — I have selected it. And then scroll down and click Next

Provide a name for your App, Click Create App button,
You will get the below screen,

Now scroll down to Messenger

Click Set up

Scroll down to Access Tokens section,

Click Create new Page
Give a page name – Mypegademoapppage – Camel casing does not work 🙂
Category is mandatory – so give as per the options available. I chose Property.

Click Create Page and then click Save.

Now scroll a little bit

You can see, Home Groups Events Reviews More. Click More and go to About

Click About
Scroll down–

Now go back to the Meta for developers tab on your browser. From where you clicked
‘Create new Page’ button

Now at this point in time you may see lot of tabs are opened in the browser,
So log off from Facebook account, all the tabs will be logged off
Now login again in Facebook account
You will land up to your account 🙂

Login to Facebook for developers,
You will see on the left top corner – your app name – MyPegaDemoApp
And on the top right corner – your account name – Pega Poc

So Facebook account is – Pega Poc
In Meta (Facebook) for developers – App name – MyPegaDemoApp
Now click ‘Add or remove Pages’
Click ‘Continue as Pega Poc’
You can see your newly created Page – Mypegademoapppage


Click Next

Click Done and then Click OK
You will come back to the main screen,

Your page has been added successfully,
So lets summarize here—
Login to Meta (Facebook) account – with your Userid/password – Pega Poc – Account Name.
Login to Meta for developers – same user id password will be taken automatically.
Create an app – MyPegaDemoApp
Create a Messenger Set up
Create a Page – Mypegademoapppage
Add the Page (Mypegademoapppage) in the App (MyPegaDemoApp) of the Account (Pega Poc)
Now click Generate Token

Now click Done. Next is Webhooks.

Add Callback URL
For this, you need a https:// — URL but am using Personal edition.
So I will use ngrok to convert my personal edition URL to https:// URL
Download and install ngrok from internet and convert your URL to https://
In case you face issue — let me know in comment section.
Now go to the Meta for developer screen again,

Click Add Callback URL

Click Verify and Save
You will get the below screen

Now click Add subscriptions

Click Save
You will see the webhooks added successfully

Pega Configuration:
Login to Pega and go to App studio –> Go to Channels

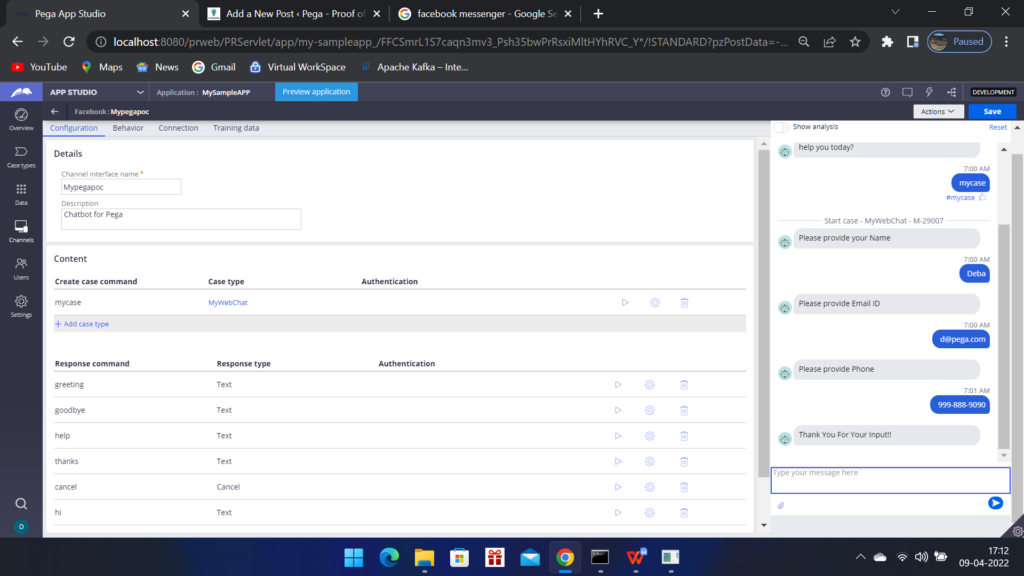
Create Facebook channel Mypegapoc.
Configuration Tab:

Add a case type — I have added MyWebChat
Behavior tab:

Enter the correct Authentication URL (callback) – created above
Connection tab:


Yes, I have entered ‘hi’ and a reply (Hi, I am your Pega Platform Chatbot. How can I help you today?) came.
Now lets test in Meta (Facebook) messenger.
Go to your account and click Home icon on the top of the page.

On the left hand pane – click Pages
You will see all the pages

Now click the page under Pages you manage – Mypegademoapppage (I want to chat in this page as I configured this page with Pega).
Now click the messenger icon on the top left corner of this page. You will get the chat pop up

Type ‘hi’ — Pega will reply — Welcome to chatbot powered by Pega

Type ‘case’ — Pega will initiate the MyWebChat case and ask the questions set in that case type

Pega Case type to be included in the Facebook Channel:

How to select questions — Steps – More – Automations – Question


Notes:
Ngrok will expire after sometime — So if the Pega is not replying in the Meta (Facebook) chat that means it is expired.
Then generate another https:// URL from ngrok
Change the same in the

Then go to Pega App studio, Open Facebook channel — go to behavior tab and UPDATE the Authentication URL (callback) with new ngrok URL
The is the End of this POC and I hope you will be able to do it by yourself as well.
If you have successfully done it. Then Pat on your back. ;-).
If you have faced any issue please let me know in the comment section. I will get back to you.


This is good and highly helpful.
Can you do a blog on “Mashup” ?
Thanks Sabarish for visiting my blog. I will definitely post something on Mashup.
Thanks for sharing. Quite descriptive.
Thanks Durga Teja.
The article is good. I will try it by myself.
Thanks Nitish. Please try by yourself and if you face any issue please let me know. I will help you to solve the same.
This is pretty nice one. Very helpful.
Thanks Arnab. Please do share with your friends.