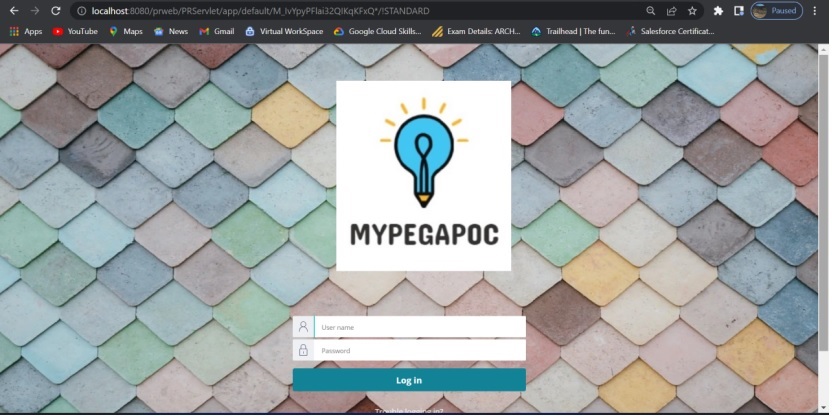
This POC will explain how we can change the look of the Login screen that is how to change the Logo and Background of the Login Screen.
Demo Video:
Steps are as follows:
- Create a new ruleset (NewLoginScreen:01-01).
- Add the new ruleset (NewLoginScreen:01-01) in your Application.
- Create a binary file for Logo (CompanyLogo).
- Create another binary file for Background (BGImage2).
- Save As Web-Login in your Application and in the new ruleset (NewLoginScreen:01-01) and update the Logo.
- Save As py-login-screen in your Application and in the new ruleset (NewLoginScreen:01-01) and update the background image.
- Create a new Access Group (NewLoginScreen).
- Provide the Role as PegaRULES:Guest.
- Go to the Records–SysAdmin–Requestor Type and add the new Access Group.
- Log off, to experience the new look.
Create a new ruleset (NewLoginScreen:01-01) and add it in the application

Go to Records–Technical –Binary

Click Create

Select the correct ruleset – NewLoginScreen
Click Create and open
Now upload the image that you want for the company Logo and Click Saves

Now create another binary file and upload another image for the background (BGImage2).
Now create another binary file and upload another image for the background (BGImage2)


So we have create 2 binary files and uploaded 2 different images, Logo and background images
Now search for Web-login HTML rule in the search

Click the 1st option
Now search for py-login-screen Text File rule

Click the 1st option
Now both the rules are open on the screen,
Go to the Web-login rule and Save As it in your application and in the new ruleset NewLoginScreen

Do the same for the py-login-screen, Save As in the new ruleset – NewLoginScreen

Now both the rules Web-Login and py-login-screen are in your application and in the new ruleset – NewLoginScreen
So open the Web-login which you have in your application,
Look for,
Title
<title>
<pega:lookup property=”pxRequestor.pyCaption” value=”Login Page” />
</title>
You can change it or you can keep it. It’s up to you. I did not change.
Search for Logo

<div class=”logo-container”>
<img src= ‘webwb/pzpega-logo.svg’ class=”logo” alt=”Pega Logo” />
</div>
Change it with your image – as below,
<div class=”logo-container”>
<img src= ‘webwb/CompanyLogo.jpg’ class=”logo” alt=”Pega Logo” />
</div>
Now, open the py-login-screen rule that you have Save As in your application, and search for background.

Now change the below code
background-image: linear-gradient(-25deg, #125876 0%, #1f2555 30%);
To
background-image: url(webwb/BGImage2.jpg);

Now create a new Access Group


Select the application that you want to access, having the new ruleset.
Provide the Role – PegaRULES:Guest
Now go to the Records – RequestorType –

Select the name PEGA!BROWSER – take the one – RS: No associated ruleset

Add your access group and select it as above.
Save the rule
All done now it’s time for testing.
Just logoff and you will get your new login screen.

This is the end of this article. Hope you liked it 🙂
Please feel free to write your valuable comments in the comment section.
Appreciation leads to motivation !! So if you appreciate my work I will get motivated and I will post more articles. 😉
Please do share the blog with your friends so that they can also learn.


Your articles are so rich, very insightful. Appreciate your time and effort to develop the community. For me you are DebaPega Chatterjee☺
Thanks Vijay. 🙂 Please keep visiting my blog and inform your friends as well.
Hi your articles made me learn new concepts in pega , please do more interesting topics and we appreciate your time and effort for doing all these concepts. Thankyou from my end as a fresher initial i don’t have any idea on pega but going through your articles made me to pick the pace. If your having some free time we are looking forward to learn new concepts through you, through a online session.
Thanks Harshit for your kind words. Keep visiting this blog for new articles and please practice as well.
Online sessions, yes it is my mind but not yet decided. 🙂